Showing posts with label SU demo. Show all posts

Saturday, July 30, 2016

A Week With Best Birds and Birds & Blooms Post 8

Howdy All!
Today will be my last post for my 'A Week With Best Birds and Birds & Blooms' series. For this last post I have a set of cute tags and a little box to keep them in.


I used the Affectionately Yours Designer Washi Tape and grabbed my color inspiration from that. I created this little box to hold them with the Gift Bag Punch Board, starting with a 10"x5" piece of Watermelon Wonder cardstock.


This would make a cute Hostess gift or to keep for yourself.


Here is my Supply List:

Stamps: Best Birds
Ink and Paper Colors: Watermelon Wonder, Whisper White, Night of Navy, Cucumber Crush, Mint Macaron, Crumb Cake
The Rest: Birds & Blooms Thinlits dies, Affectionately Yours Washi Tape, Gift Bag Punch Board, Linen Thread, Whisper White and Night of Navy Solid Baker's Twine, Cucumber Crush and Watermelon Wonder 5/8" Mini Striped Ribbon, 5/8" Whisper White Organza Ribbon, Layering Circle Framelits, Scalloped Tag Topper

Well, That's it for today, and that's it for my Week of Best Birds and Birds & Blooms dies Bundle. I had lots of fun concentrating on just one stamp set and I really like my projects. This was a very versatile bundle to work with.

Thanks a bunch for stoppin' by and I will see you again soon.

Hugs,

Friday, July 29, 2016

A week With Best Birds and Birds & Blooms Post 7

Howdy All!
I am still playing around with the Stampin' Up! Best Birds stamp set and Birds & Blooms die bundle. I am having so much fun watercoloring the adorable birds, branch and flowers. For this first card I stamped all of my images with the Basic Black Archival ink onto Shimmery White cardstock. I water colored the images using an aqua painter. I could not get a good photo, but the shimmer shines through the color and is so pretty! If you click on the 2nd photo and zoom in, you can kind of see the shimmer.

Anywho, it's a pretty basic layout, which is my go to style. I really like a clean, crisp card! Oh, and I just love that gold metallic thread. It is so delicate and pretty! Such a great accent! My colors are Blishing Bride, Watermelon Wonder, Old Olive, Soft Suede, Pool Party and Crushed curry.


My second card also has a simple, clean and crisp layout. Instead of coloring this little guy in, I decide to sponge a background for him. I just cut out a circle from the Layering Circle Framelits and placed it where I wanted it and then sponged around it in Soft Sky ink. It is stamped in Chocolate Chip ink. My colors used are Soft Sky, Chocolate Chip, Wild Wasabi and Very Vanilla. I used the Woodgrain Embossing folder to add some extra texture and of course some Linen Thread. Another great masculine card.


Well, that's all for now. I have one more project to show you in my next post. Thanks a bunch for stoppin' by and I hope to see you again soon.

Hugs,

Thursday, July 28, 2016

A Week With Best Birds and Birds & Blooms Post 6

Howdy All!
Wow! I can't believe I am on my 6th post featuring this awesome bundle. After looking at all the cards I have made so far, I decided I needed to see if I could create a kids card. I really wanted to see how versatile this bundle could be.  I have used this card idea for many years and I thought the birds and branch were perfect for coloring. You can buy crayons super cheap right now and make up several cards that are ready to go. This could even go to someone who is an adult and just enjoys coloring, right? I decided not to stamp a sentiment on the front and will instead add it to the inside when I know to whom it is going and for what occasion.


I thought I would have a second attempt at a kids card by using some primary colors. I found this fun layout at Pals Paper Arts, sketch #310.


I stamped the background using the cute little flower stamp and layered all of those circles using the Layering Circle Framelits.

One thing that I like about using these colors is that the card works well for boys or girls!


Here are my supply list:
Card 1:
Stamps: Best Birds
Paper: Crumb Cake, Basic Black, Whisper White
Ink: Tuxedo Black Momento
The Rest: Basic Black Solid Baker's Twine, 1/8" circle Punch, 3 different colored Crayons

Card 2:
Stamps: Best Birds
Paper and Ink Colors: Watermelon Wonder, Cucumber Crush, Daffodil Delight, Night of Navy, Whisper White
The Rest: Layering Circle Framelits, Birds & Blooms Thinlits

Whew, that's all that I have for you for now! Thanks a bunch for stoppin' by and I hope to see you again soon!

Hugs,

Wednesday, July 27, 2016

A Week With Best Birds and Birds & Blooms Post 5

Howdy All!
I am going to keep it moving with my week long challenge. While the Stampin' Up! annual catalog proves to be an incredible source for ideas and inspiration, I often find myself looking for something new and different. This is when I will turn to one or more of the many paper crafting challenge blogs. I have a list of about 2 dozen such blogs that I will visit on a weekly basis. I even have entered cards for consideration as a 'winner.' The ones I like to participate in most are the Sketch Challenges and the Color Challenges. But you can find challenges that include inspiration photos, specific themes or the inclusion of a certain tool or embellishment. Just look at my sidebar to the right to see some of my favorite blogs.
A couple of weeks ago I created this card to enter in the HSS Sketch Challenge #241 and was one of their Artist Picks! They even gave me a badge to display on my blog to show I was a winner. Check it out here and here.


You can see my Blog post here that gives the details for my card.


This next card I created for a Color Challenge over at the Colour Q Blog. As often happens with me, I will get the card finished and then forget to blog about it and upload and enter it into the challenge. lol.

The colors I used that were for the challenge were Blushing Bride, So Saffron, Old Olive, Pool Party and Whisper White.


I really like how it turned out, and even though I didn't get it entered into the challenge it will get sent to somebody special who will appreciate my effort!

Well, that's all I have for now. Thanks a bunch for stoppin' by and I hope to see you back again soon!

Hugs,

Tuesday, July 26, 2016

A Week With Best Birds and Birds & Blooms Post 4

Howdy All!
I am back with 2 more cards I created using the Best Birds stamp set and inspiration from the Stampin' Up! annual catalog. So far I have used the "You Can Make It" feature to make a card, then I changed it by using different color combos, and then I Stepped it Up by adding different elements. When I get my new catalog, I go through it not only to pick what stamp sets I want, but also I mark individual cards that I like. I had this one card that I have been wanting to make, but I do not own the stamp set that was used on it. You can check it out on page 133 of the current annual catalog. The first thing that caught my eye about this card is that it is a masculine card. I never have enough guy card ideas and I love the simplicity of the layout. I wasn't sure I could pull off a masculine card with the Best Birds stamp set, but I was willing to give it a try. Here is my first attempt:


For my card, I used watercoloring but not in the same way that SU! did. Again, I wanted this to be an easier card so I just did a quick three-color watercolor background. Then I just stamped the image and sentiment right over the top. I made another one using some different colors and I changed which way the branch was facing. Oh, and I changed where I wrapped the linen thread. Man, I love linen thread for masculine cards! It's the perfect way to embellish a card without making it 'girly.'


 I am trying to figure out which one I like better. I am not sure, how about you? And I definitely think I pulled off the manly card using this stamp set!


Here is my supply list:

Stamps: Best Birds
Paper: Card 1: Crumb Cake, Dapper Denim, Watercolor Paper. Card 2: Soft Suede, Bermuda Bay, Watercolor Paper
Ink: Tuxedo Black Memento ,Card 1: Dapper Denim, Bermuda Bay, Wild Wasabi  Card 2: Dapper Denim, Bermuda Bay, Pear Pizzazz
The Rest: Linen Thread, Aqua Painters

That's all for now! Thanks a bunch for stoppin' by and I hope to see you again soon! Up next: Where else do I find inspiration?

Hugs,

A Week With Best Birds and Birds & Blooms - Post 3

Howdy All!
It's me again, continuing on with my creative process using the Best Birds stamp set and Birds & Blooms dies bundle.This is the card from my last post that I chose to work with. I just love how pretty these colors are together, don't you? Let me show you how adding a few different elements can really change the card.


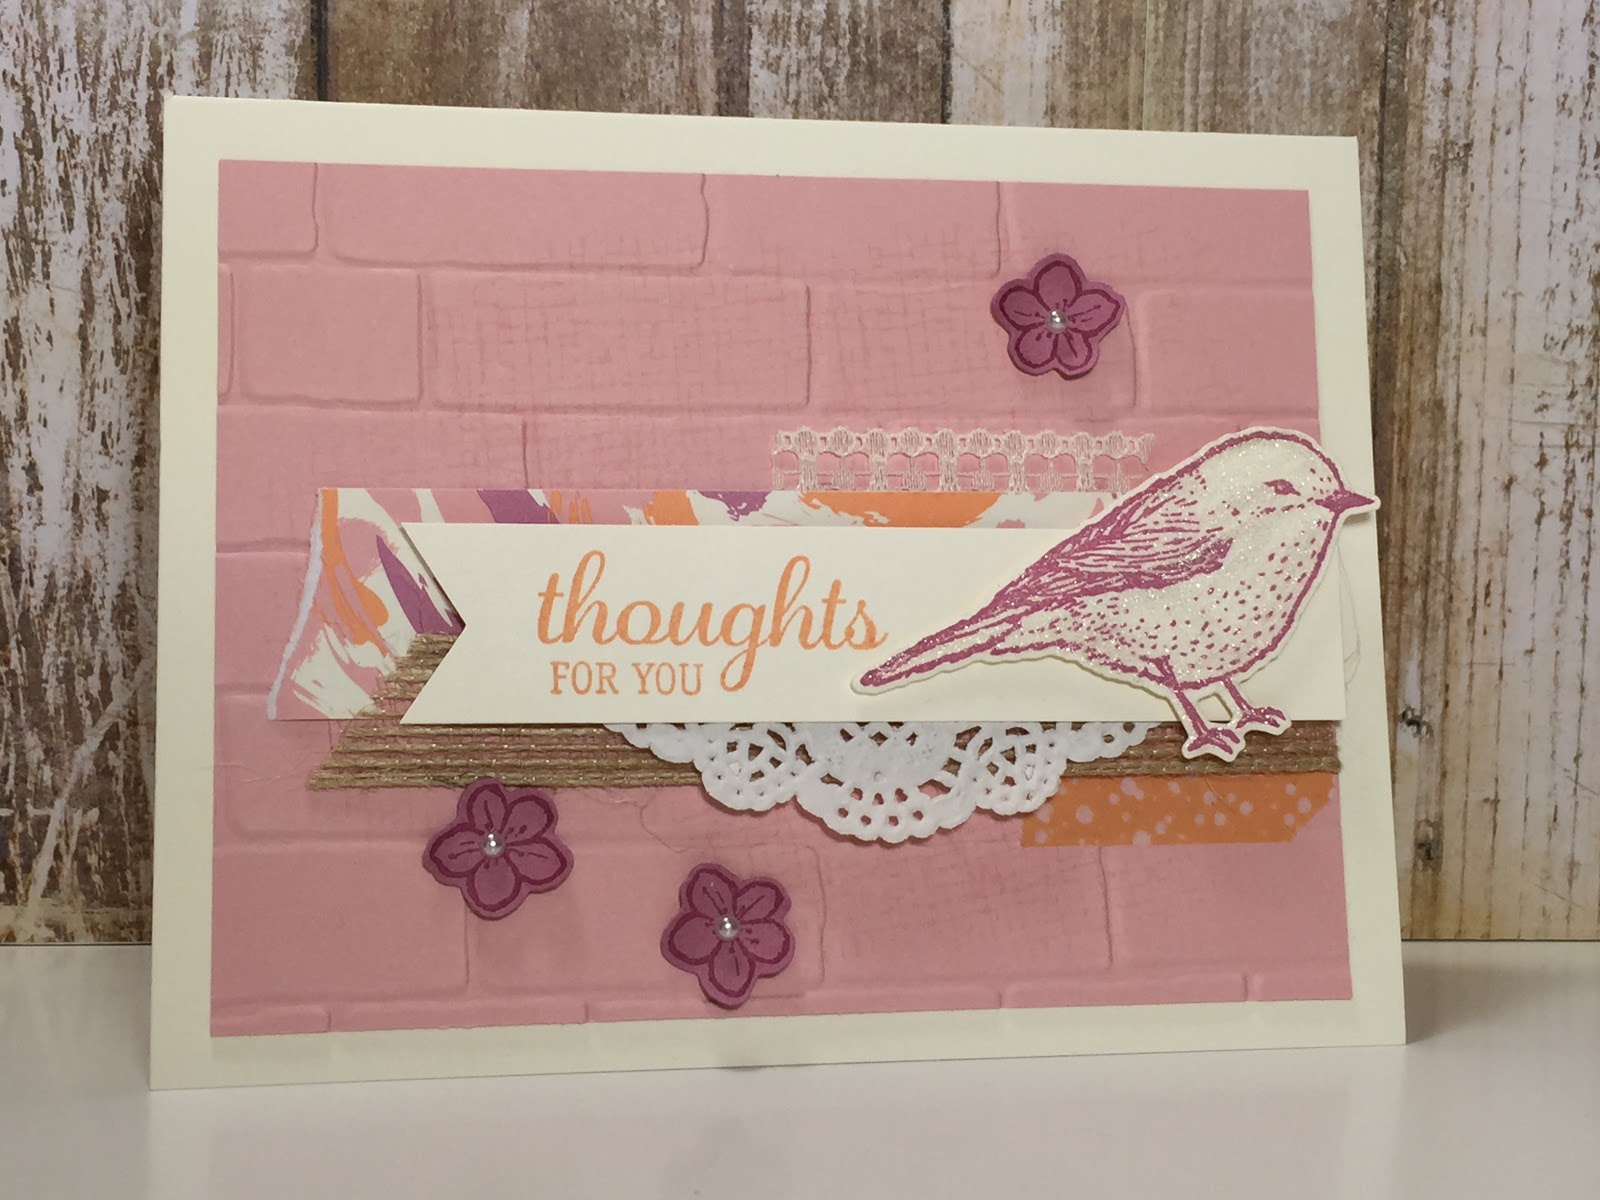
So, I decided to start with the Blushing Bride layer. After I stamped the background stamp that is in the Best Birds stamp set in Blushing Bride ink, I ran it through the Big Shot using the Brick Wall Textured Impressions Embossing Folder, to give it some depth. Since I was inspired by the colors in the Playful Palette DSP stack, I layered a 1" strip between the Burlap ribbon and the Very Vanilla banner with the sentiment. The last thing I did was to change the size of the Pearl Basic Jewels to make them stand out a little more. Looks pretty good, huh?


Now, I decided to go a little bit further to really Step it Up. I added a piece of Playful Palette Washi tape below the Burlap ribbon as well as a piece of Very Vanilla 1/2" Lace Trim above the DSP strip. I then added 1/2 of a Delicate White Doily under the bottom of the sentiment banner. I stamped some of the little flowers in Sweet Sugarplum ink onto Sweet Sugarplum cardstock and cut them out with the coordinating die, then added some Pearl Basic Jewels to the centers. Lastly, I took the Wink of Stella Clear Glitter Brush pen and colored over the whole bird image. I'm not sure if this last step shows up very well in the photo, but it looks amazing in real life!


Just look at all that dimension and texture!! I love it! Who wouldn't be impressed receiving this beautiful card?!


So there you have it! You can decided how much or how little you want to add to get the final result you are going for. This may also depend on the supplies you have and how much time you want to spend on creating a card.


Don't they look neat all lined up next to each other? You can really see the progression of the first card to the last.

Well, that's all for this post. Thanks a bunch for stoppin' by. Join me again for my 4th post to see how else I use the annual catalog to get inspiration for creating my cards.

Hugs,

Monday, July 25, 2016

A Week With Best Birds and Birds & Blooms Post 2

Howdy All!
Here I am with my 2nd post of the week.
after finishing my 2 cards that I copied from page 53 of the 2016-2017 Stampin' up! annual catalog I decided to continue my creative process using this card.


I wanted to see what it would look like using a different color combo. I flipped through the catalog and the cards on page 143 caught my eye. Again, they were part of a "You Can Make It" so there was no guessing at what the colors used were. Here is my card using Pear Pizzazz, Bermuda Bay and Melon Mambo. I love it!


I wanted to try it in one more color combo, so this time I turned to the pages in the catalog that have the Designer Series Papers. I will often go here to find color combos that I know will work great because Stampin' Up! has done all the hard work for me! I chose the colors from the Playful Palette Designer Series Paper Stack on page 174 to work with. Here is my card using Blushing Bride, Sweet Sugarplum, Peekaboo Peach and Very Vanilla. I really like how it turned out!


So, there you have it! I love how each card looks different. There are so many options when selecting colors this way.

For my next post I will take this same card and show you how to 'Step It Up' by adding a few more elements to create something new while still keeping the same basic layout and colors. Fun!

Well, that is all for now. Thanks a bunch for stoppin' by! See you back again soon!

Hugs,

A Week With Best Birds and Birds & Blooms Post 1

Howdy All!
I belong to a Stampin' Up! Team called the Glad Heart Stampers and our amazing leader, Missy Shipman, has given me the opportunity to create and share 8 projects using the Best Birds photopolymer stamp set and the Birds & Blooms Thinlits Dies. So, over the next week I will be posting all of my wonderful projects along with a little bit of my creative thought process along the way.
Here is the actual bundle that Missy sent me to work with.


I wasn't sure where to start, so I looked to see if there were any samples in the Stampin' Up! Annual Catalog that I could use as a starting point. Sure enough, I found just what I needed. 


Lucky me! This set had a "You Can Make It!" section which gives the exact 'recipe' to make the projects that are shown! Here are the 2 cards that I made and I think they turned out perfectly.


It was a great way to get my stamps inked up and become familiar with the stamp set and dies.


What I love about using the catalog as inspiration is that I can quickly and easily make a card without having to think about what colors I should use or what the layout of the card should be.


I know for me, that when I first get my new catalog and start making my 'Wish List' I usually am attracted to the samples first and then I look more closely at the set to determine if I 'need' it or not. lol. 

Up next, I will talk about how I can take one of these cards and make it my own and also how to "Step It Up" as much or as little as you want!

Here is my Supply List:
Stamps:  Best Birds
Paper:  Whisper White, Night of Navy
Ink:  Flirty Flamingo, Mint Macaron, Night of Navy
The Rest:  5/8" Burlap Ribbon, Pearl Basic Jewels. Banner Triple Punch, Birds & Blooms Thinlits Dies

Well, that's all I have for now. Thanks a bunch for stoppin' by. I will be back soon for my next post using this same bundle!

Hugs,

Monday, July 27, 2009

Another Card From My July Card Class

Good Day to all! Here is another card from my class that I had for July. I used more of the new In-colors and the yummy new designer series paper called Razzleberry Lemonade. Isn't it delicious? I used the 1 1/4" square punch to get all of my little squares. I ran my tombow adhesive in a grid over a 3.75 x 5 inch piece of cardstock and then applied the squares randomly. When I finished I ran it through my Big Shot using the Bigz Top Note die. I am in love with the Rich Razzleberry polka dot ribbon! Here is the complete recipe:( All products are from Stampin' Up!)

Stamps: Razzle Dazzle

Paper: Melon Mambo, Crushed Curry, Only Orange, Whisper White, Razzleberry Lemonade designer series paper

Ink: Melon Mambo

Accessories: punches (1 1/4" square, modern label, word window), Big Shot, Top Note die, Rich Razzleberry polka dot ribbon, dimensionals

Thats all I have for now. I have been very busy fixing and cleaning and painting (we put our house on the market 3 days ago).
Thanks so much for stoppin' by!

Friday, July 24, 2009

July Card Class Projects

Good Morning All,
I would like to show you the projects that I prepared for my July card class last week. We celebrated the new Stampin" Up! catalog and used lots of the new In-Colors. This first project is one that I like to offer at my classes and I give my stampers a choice to either make a 6x6 scrapbook page or a 3x6 card.I love this new stamp set called Circle Circus! There is so much you can do with it. I used 4 of the 6 new In-Colors including the Bermuda Bay polka dot grosgrain ribbon. Isn't it fun?Here is the complete recipe (all products are SU! of course):
Stamps: Circle Circus, Wow Flowers
Paper: Kraft, Rich Razzleberry, Bermuda Bay, Crushed Curry textured, Whisper white
Ink: Rich Razzleberry, Bermuda Bay, Crushed Curry, Soft Suede
Accessories: 3/4", 1", 1 1/4", 1 3/8", scallop circle and scallop edge punches, silver brad, dimensionals, Bermuda Bay polka dot ribbon
I used dimensionals to pop up the scallop circle image and also under the Happy birthday stamped image from the Wow Flowers set. Fun, isn't it?
That's it for now. I will be back to post some more of my July card class projects! Thanks for stoppin' by.

Tuesday, June 16, 2009

Playing Catch-Up

OMG! I can't believe it has been over a month since my last post. I have been overwhelmed with feeling like I have so much to do and no time to do it all. My husband and I took our youngest son, Alex, to England in the middle of May so he could participate in a program where he is studying at Oxford. We spent about a week there and when we got home I wound up being sick for 2 weeks. I still have a little congestion that just keeps hanging on. Of course I am still working on our house, painting one of the 5 bedrooms we have at present. I haven't even been out to my gardens...Anyway, I was getting prepared for my monthly stamp class tomorrow and I realized that I never posted the projects from last months class. Here are some of the projects we did. My class was a Dads and Grads class. All products are Stampin' Up!.
Real quick here with my deets: For the Tool card I stamped the images on brushed silver cardstock and cut them out, I then stamped the handles on chocolate chip cardstock and paper pieced them.
For the graduation bear I used the grad cap from the Sock Monkey Accessories set. It fits perfectly! I also used the new Jumble Alphabet set from the new catty. The 6x6 page and 3x6 cards I kept very simple. I just love those corduroy buttons, don't you? I know I haven't given a complete recipe for each projects, I just don't have the time right now. If you have any questions don't hestitate to leave a comment and I will get back. Thanks so much for stopping buy and I hope to find a few minutes whenever possible to get my projects posted!


Thursday, May 7, 2009

One More Projct


Here is the last projct that I did for my April stamp class. I have been wanting to introduce scrapbooking to my customers, so I decided to give them the option of either making a 3"x6" card or a 6"x6" scrapbook page. About half of the ladies chose to do a scrap page so I think I will offer a projcet like this each month! I used a simple layout that works beautifully for a card or a page. Here is the recipe:

Stamps: Big Flowers, One of a Kind


Paper: Kiwi Kiss textured cs, Riding Hood Red textured cs, Pink Pioruette, whisper white, Bella Rose DSP


Ink: Riding Hood Red


Accessories: Styled Silver Hodgepodge Hardware, 1 1/4", 1 3/8", scallop circle punches, eyelet border punch, small oval and designer label punches, dimensionals
Gotta run! Thanks for stoppin' by!


Tuesday, April 28, 2009

More From MY April Class

Here are a couple more projects from my April Showers Card Class. The vase of flowers was so much fun. I wanted to demonstrate the Decor Elements, so we used them to decorate our vases. Here is the recipe:
Stamps: Petal Pizzazz
Paper: Whisper White, Chocolate chip, Summer Sun
Ink: Regal Rose
Accessories: Circle punches, decor elements, Kiwi Kiss striped grosgrain ribbon, dimensionals, lollypop sticks(Wilton), glass vase(Michaels), white stones(Joanns)
I cut the sticks to different lengths and cut the flowers out with my paper snips. It makes such a lovely accent to a desktop or table!
The Best Wishes card was very simple but effective! Here is the recipe:
Stamps: Oval All
Paper: Walk in the Park DSP, Whisper White, Baja Breeze, Vellum cardstock
Ink: Baja Breeze
Accessories: Scallop oval and large oval punches, Whisper White organza ribbon, Big Shot, Manhattan Flower textured impressions die, dimensionals
I played around with this a bit and found that the vellum cardstock worked better than the paper and on the multi-platform for the Big Shot I used NO tabs, otherwise the impression would cut right through the vellum. I only used adhesive for the vellum underneath the ribbon. the sentiment is on dimensionals! I hope you enjoyed seeing the projects. Stop back again soon to see what else I have been working on! Thanks for stoppin' by!

Monday, April 20, 2009

Flower Pot Pocket Card from my April Showers Card Class

I held my April card class on Wednesday, which was appropiately titled "April Showers Bring May Flowers" and this class was centered around all things flowers! I love flowers and this was such a fun class for me to prepare. The first card we did was a flower pot pocket card. I discovered this on my fav site, SCS, Monday's try a new technique post. Check it out here. There is a link to a fabulous tutorial also. This card was a huge hit and pretty easy to do. Give it a try! Here is the recipe:
Stamps: Blooming With Love
Paper: Really Rust, Whisper White, Summer Sun, Pink Passion, Lovely Lilac, almost Amethyst, Garden Green
Ink: Lovely Lilac
Accessories: Big Shot, Cherry Blossom embosslit die, 5 petal flower punch(for the leaves), silver brads, silver eyelet, Crop-a-dile, 1 1/4 " and 1 3/8" circle punch, Apricot Appeal 1/4" grosgrain ribbon, scallop edge punch, linen thread, dimensionals
I did alter my dimensions slightly to maximize my really rust cardstock. For the flower pot I started with a 3 1/2" x 8 1/2" piece scored at 3 1/2" and 7". This way I could get 3 cards from 1 piece of 8 1/2 x 11 cardstock.
I hope you give this a try. I will be back with more projects from my April class.
Thanks so much for stoppin' by!
Have a wonderful day!

Monday, April 13, 2009

Another set of stamp camp cards

Good morning All,
I just wanted to post more pics of a recent stamp camp that I did for a friend of mine. Most of the ladies that attended had never stamped before, so these cards were fairly simple.
I decided to use some basic layouts with minimal layers. The little Easter pouches were a big hit and were very easy to make. They are made from a 6" x 6" piece of DSP. The directions can be found here from the Splitcoaststampers website. Check it out!
Well, this needs to be short and sweet. I have my monthly stamp class to get ready for on Wednesday.
Thanks a bunch for stoppin' by and have a wonderful day!


Monday, April 6, 2009

More Stamp Camp PRojects

Good morning! I really meant to upload my stamp camp project pics from the past couple months over the weekend, but then my little sister had a baby! So, I was preoccupied with taking care of her 2 1/2 year old daughter while my sis was in the hospital. Wow! Does that little tike have alot of energy. Apparently naps are a thing of the past...or maybe my niece was just having too much fun playing with Aunt Sandy and Uncle Craig! Whew! I am whipped! So, any way, here are the pics from my Let's Get Punchy class.
The only one I don't have a close up of is the the dress and purse Mother's day card. We had lots of fun with this class everyone got quite a workout with all that punching. There really isn't much stamping on these cards except for the sentiments. And, of coarse, all products used are from Stampin' Up!. If you have any questions about these cards or any other projects you see on my blog, please don't hesitate to contact me. I would be more than happy to send you instructions or product lists. I've got some swaps that I must get started on, I will be back soon to post more stamp camp pics! Thanks for stoppin ' by!